Tailwind Crash Course - Project Based Learning
Borders
Let’s start about Borders. Borders are something that gives your project a nice styling. Tailwind CSS makes working with border very simple
Basics of border classes:
.border: It will add a nice 1px border.
But to control thickness of the border, we have formula 😊:
| Thicknesses | Pixel |
|
0 |
0px |
<html>
    <head>
        <script src="https://cdn.tailwindcss.com"></script>
    </head>
    <body>
      <div class="m-6 p-4 w-32 h-32 bg-gray-100 text-gray-800 border-2"”>.border</div>
    </body>
</html>
How to pick side of your border using Tailwind? There are 4 modifiers to do that.
l: leftr: rightt: topb: bottom
They all work with different thicknesses. So, the formula will look something like:
| Sides | Thicknesses | Pixel |
| t, b, l, r |
0 |
0px 1px 2px 4px 8px |
<html>
    <head>
        <script src="https://cdn.tailwindcss.com"></script>
    </head>
    <body>
      <div class="m-6 p-4 w-32 h-32 bg-gray-100 text-gray-800 border-t-4”>.border</div>
    </body>
</html>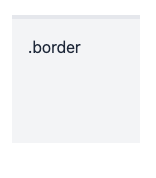
We have 2 new modifiers {x|y} which help us to shorten our code if we have same borders on the left and right sides or top and bottoms sides.
- X means left and right
- Y means top and bottom
Code example:
<html>
    <head>
        <script src="https://cdn.tailwindcss.com"></script>
    </head>
    <body>
      <div class="m-6 p-4 w-32 h-32 bg-gray-100 text-gray-800 border-x-4”>.border</div>
    </body>
</html>
Border Colors:
Color works exactly same way as it does with background and with text. Formula is also similar. You just need to put border instead of bg or text.
border-{color}-{shade}
COLOR TABLE HERE
Code example:
<html>
    <head>
        <script src="https://cdn.tailwindcss.com"></script>
    </head>
    <body>
      <div class="m-6 p-4 w-32 h-32 bg-gray-100 text-gray-800 border-x-4 border-blue-500”>.border</div>
    </body>
</html>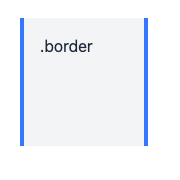
Border Style
Border can be different in style. Default is different. Here is formula and table to know about different styles of border.
| Styles |
| solid dashed dotted double none |
Code example:
<html>
    <head>
        <script src="https://cdn.tailwindcss.com"></script>
    </head>
    <body>
      <div class="m-6 p-4 w-32 h-32 bg-gray-100 text-gray-800 border-x-4 border-blue-500 border-dotted">.border</div>
    </body>
</html>
Border Radius
In initially, you may not associate radius with borders meeting rounded corners. But it is. So the class for radius is different:
| Radiuses | rems | Pixels |
| sm [EMPTY] lg full none |
.125rem .25 rem .5rem - 0 |
2px 4px 8px 9999px 0px |
Code example:
<html>
<head>
<script src="https://cdn.tailwindcss.com"></script>
</head>
<body>
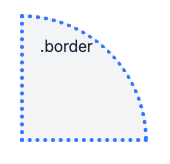
<div class="m-6 p-4 w-32 h-32 bg-gray-100 text-gray-800 border-4 border-blue-500 border-dotted rounded-lg">.border</div>
</body>
</html>
You can also use simply .rounded to keep your borders 4px rounded.
.rounded-none will be used under a parent .rounded class to remove radius.
To pick what sides we need rounded, we have {side}. Let’s take a look on the formula:
Here is the table to make you learn about choosing sides. It’s easy.
| Sides | Pixels |
| t r b l tl tr br bl |
Top-left & top-right Top-right & bottom-right Bottom-left & bottom-right Top-left & bottom-left Top-left Top-right Bottom-right bottom-left |
Code example:
<html>
    <head>
        <script src="https://cdn.tailwindcss.com"></script>
    </head>
    <body>
        <div class="m-6 p-4 w-32 h-32 bg-gray-100 text-gray-800 border-4 border-blue-500 border-dotted rounded-tr-full">.border</div>
    </body>
</html>