
Tailwind Crash Course - Project Based Learning
Background Classes
Let’s get started with the first set of classes I.e. the background classes. Let’s refer to the below syntax and table structure to understand how the formula works.
.bg-{color-name}-{shade-of-color}
|
Colors |
Shades |
|---|---|
|
Black, white |
- |
|
gray, red, orange, teal, pink, purple, green, blue, indigo, yellow |
100-900 |
So, this particular class, starts with .bg then a dash (-) then {choose a color} then optionally you are going to have {shade or the color} option. There are over 90 shades that actually come with Tailwind.
Now, if you have noticed in the above table > first row, black and white do not have a shade. Which makes sense. So it will be .bg-black and .bg-white. That’s just pure black and pure white.
Next we have multiple colours as mentioned in the above table > row two which are gray, red, orange, teal, pink, purple, green, blue, indigo, yellow. Each one of these have 9 shades starting at 100 & ending in 900. These shades are mostly based around font-weight. If you know font-weight, you know each font has between 100 - 900. This makes it very simple to know that 900 is darker than 800.
If you need custom colors in between, you can always do a fifty. For example, you have a nice range of colours. Let’s jump into code to understand.
The simplest and fastest way to get up and running with Tailwind CSS, simply pull CDN for tailwind.
<link href="https://unpkg.com/tailwindcss@^1.0/dist/tailwind.min.css" rel="stylesheet">Throughout this entire course, we are going to use this CDN because we are not going to need any customisations.
So, our basic HTML code page structure will be similar to below:
<html>
    <head>
        <script src="https://cdn.tailwindcss.com"></script>
    </head>
    <body>

    </body>
</html>
Now we add a <div> within <body> and give it a background color.
<div class=“”bg-gray-200> Your text here </div>
As a result, we have got a nice background colored area. This part can be our web page navigation. So, we simply change the text of this section from your text here to header.
<div class=“”bg-gray-200> Header </div>Now we may have our page underneath. So, We will add another div for that and one more to end our web page with footer area. Let’s do it.
// for body of webpage
<div class=“”bg-white> body </div>

// footer section
<div class=“”bg-blue-800> footer </div>
Here is the result:
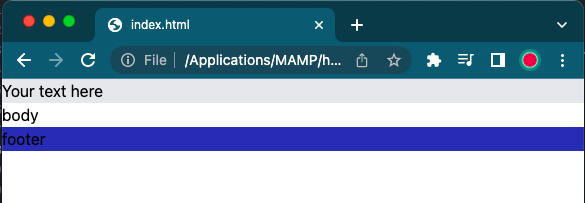
We have got three sections of a very basic layout for a website with nice background colors.
ⓘ You can check our Tailwind color palette for your reference.
Alright, let’s recap and take a look at our final code structure that we have done during this lesson.
<html>
<head>
  <script src="https://cdn.tailwindcss.com"></script>
</head>
<body>
  <div class="bg-gray-200">Your text here</div>
  <div class="bg-white"> body </div>
  <div class="bg-blue-800"> footer </div>
</body>
</html>
Next in our learning, let’s talk about sizing element using REM system
If you are not familiar with the rem,
1 rem = 1 character of document base font
What that mean is if your base font is 16px (as it is default for more browsers ), then 1 rem = 16px
We can deduce that if you needed something to be 20px wide for example, then it will be 1.25rem
Tailwind has a particular number system which does not have any decimal places.
